
Triaging a referral: Step-by-Step Guide
Triaging a Referral: Step-by-Step Guide
This training guide provides detailed instructions on how to review, clinically assess and triage referrals received through the OPERAi Electronic Referral System.
The triage process allows authorised Secondary Care clinical users to review referrals submitted by Optical Practices, examine the supporting clinical information and determine the most appropriate next action for the patient.
This may involve accepting the referral for hospital booking, requesting additional information, returning the referral to the Optical Practice with advice, or escalating the referral for further clinical assessment.
You should already be familiar with navigating the Hospital Dashboard and locating referrals awaiting triage. If you have not previously used the Hospital Dashboard, we recommend reviewing the Hospital Dashboard Overview training guide before continuing.
Important: Clinical triage decisions must always be made by appropriately authorised clinical staff in accordance with local clinical protocols, referral pathways and professional responsibilities.
Step 1: Accessing the Hospital Dashboard
Begin by signing into the OPERAi application using your authorised NHS Wales email address ending in @wales.nhs.uk.
Once successfully authenticated, you will be directed to the Hospital Dashboard. This provides an overview of the hospital or Trust site you are currently accessing, together with referrals requiring clinical triage.
Confirm your hospital details
Before accessing any referrals, check the Hospital Information section displayed on your dashboard.
This section contains information including:
- Hospital or Trust name
- ODS code
- Hospital address
- Postcode
- Registered email address
- Clinical lead contact details
Confirm that the hospital or site displayed is the location you intend to work within.
This is particularly important for clinical users who work across multiple hospital sites or organisations.
If you believe the hospital information is incorrect, do not continue processing referrals until the issue has been clarified.
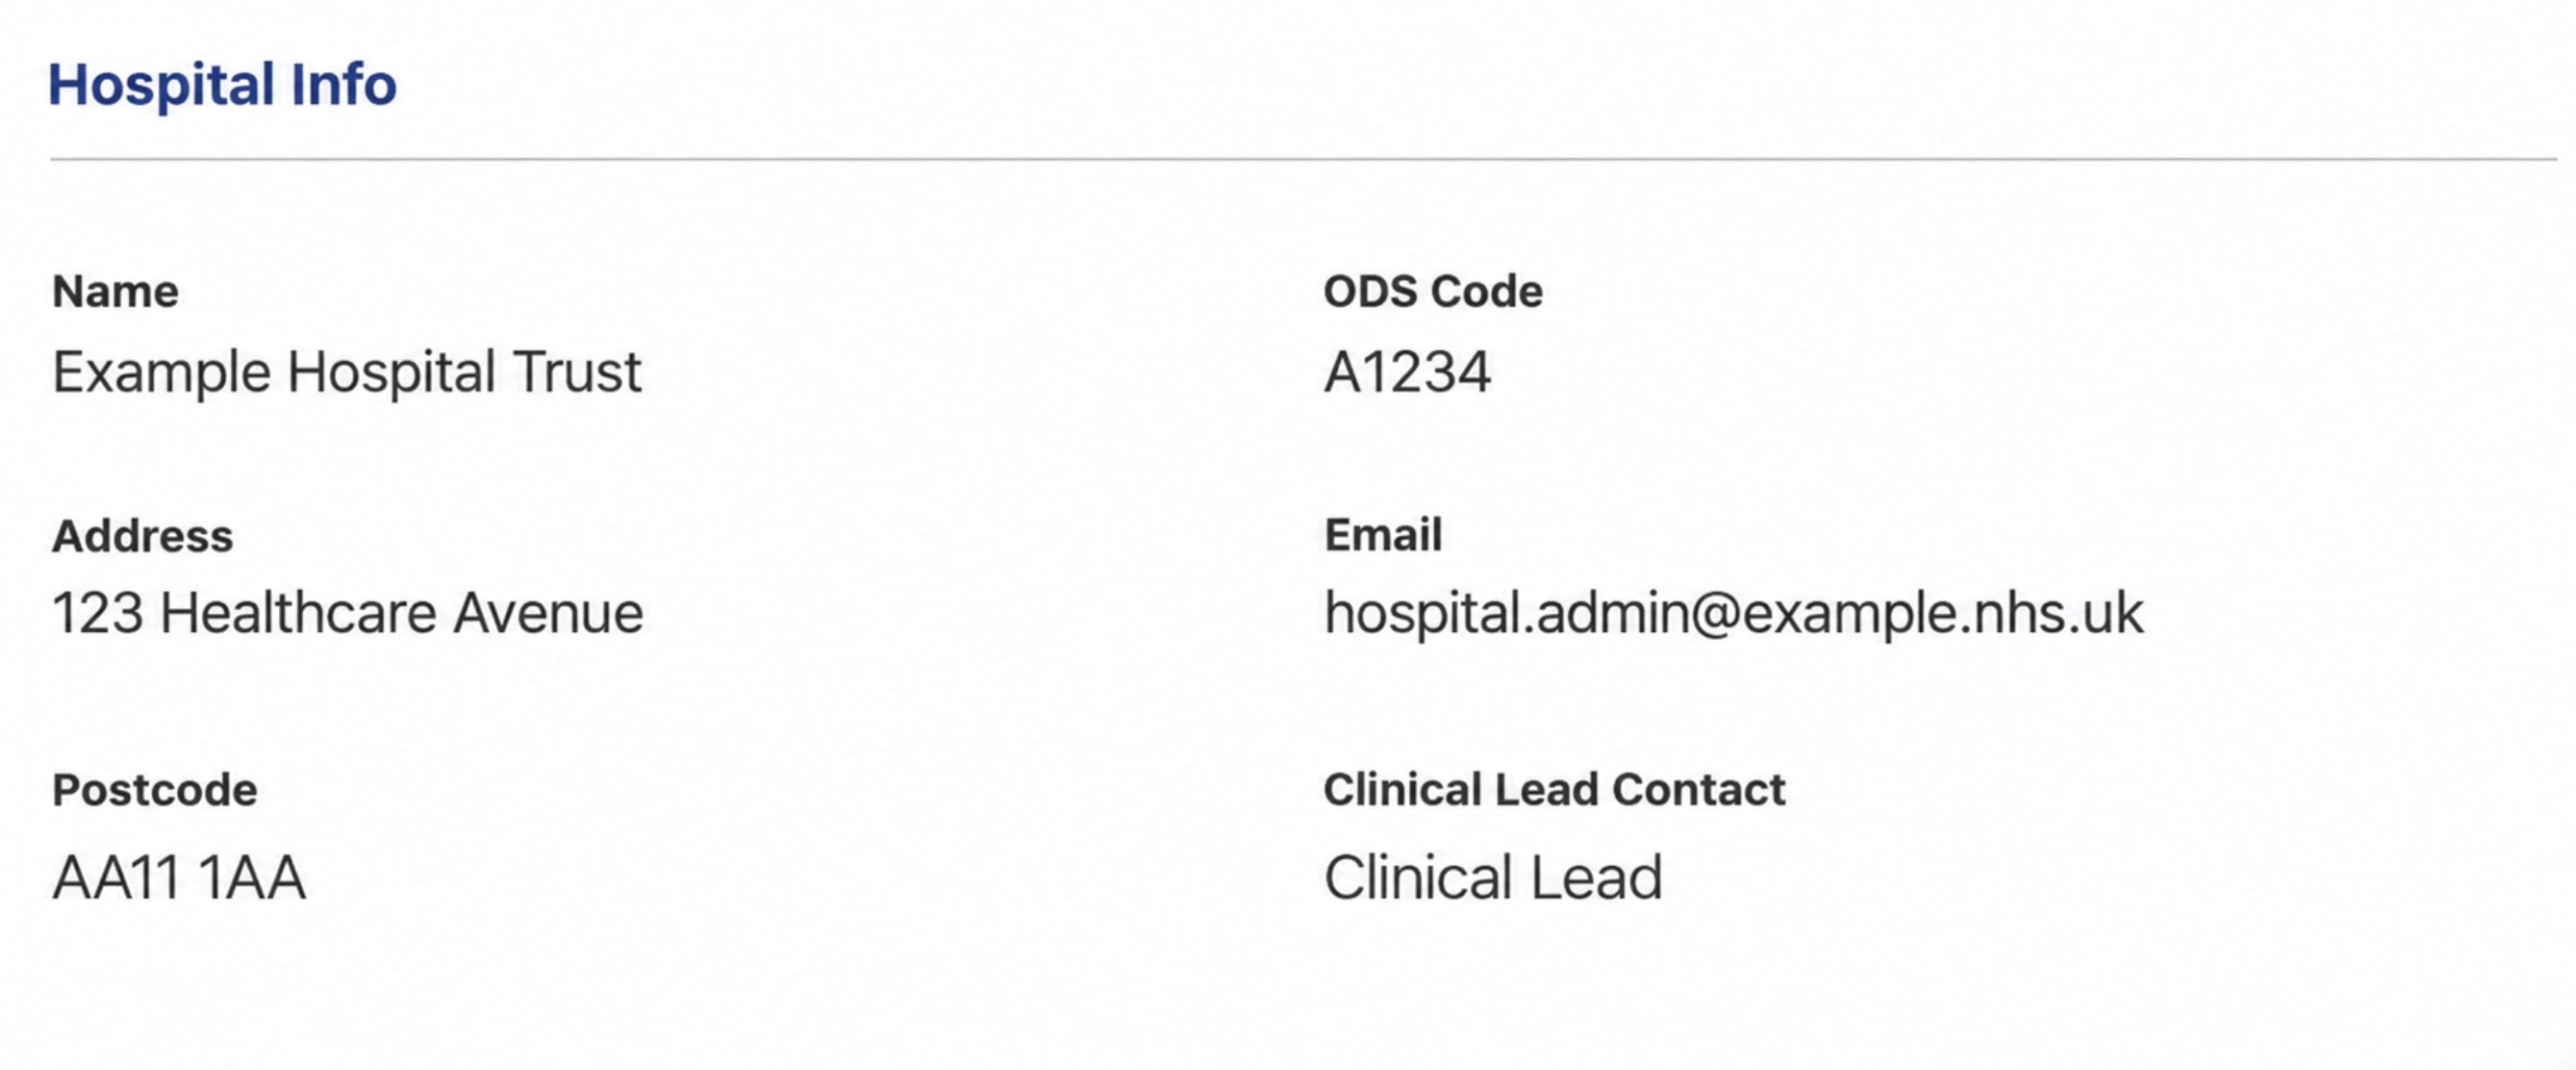
Figure 1: Hospital Information section showing the currently selected hospital site.
Always verify your hospital site when beginning a new session, particularly if you regularly access more than one organisation.
Step 2: Locating a Referral Awaiting Triage
The Hospital Dashboard provides a list of clinic types on the left-hand side of the screen.
Each clinic type represents a clinical speciality or service to which referrals have been directed.
Examples may include:
- Glaucoma
- Cataract
- Medical Retina
- Cornea
- Oculoplastics
- Paediatrics
- Vitreoretinal
- Other available ophthalmology specialities
A numerical indicator is displayed alongside each clinic type. This provides an overview of the referrals currently awaiting triage within that speciality.
Selecting a clinic type
To locate a referral:
- Review the list of available clinic types.
- Identify the speciality you wish to assess.
- Select the relevant clinic type.
- Wait for the corresponding referral list to appear.
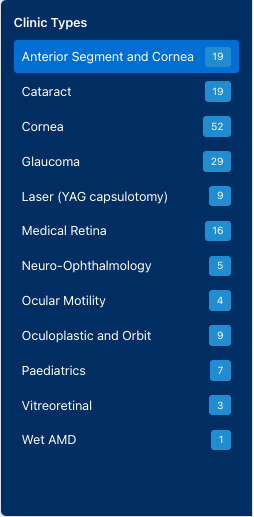
Figure 2: Clinic Types menu showing the available clinical specialities and referral counts.
Understanding the referral list
After selecting a clinic type, the main dashboard area will display referrals associated with that speciality.
Two tabs are available:
Referrals for Triage
Contains referrals awaiting an initial clinical triage decision.
Escalated Referrals
Contains referrals that have been escalated for further clinical review or secondary triage.
The referral table provides information to help you identify and manage individual referrals.
Depending on the information available, this includes:
- Referral or episode reference number
- Current referral status
- Referral date
- Patient details
- Referring practice information
- Number of days waiting
- Available actions
Review the referral list and identify the episode you wish to assess.
When you have located the appropriate referral, select the yellow View Episode button in the Actions column.

Figure 3: Referrals awaiting triage, including the View Episode action.
Pay attention to the referral priority and the number of days a referral has been waiting. Referrals should be reviewed in accordance with your organisation's clinical prioritisation and waiting-time procedures.
Step 3: Opening the Referral for Clinical Triage
Selecting View Episode opens the Referral Management screen.
This screen allows you to access the selected referral and begin the formal clinical triage process.
The referral is identified using its unique referral reference number, alongside other available patient and referral information.
Before proceeding, confirm that you have opened the intended referral.
Starting the triage assessment
- Locate the selected referral within Referral Management.
- Confirm the referral details are correct.
- Locate the yellow Triage Referral button.
- Select Triage Referral to open the clinical triage form.

Figure 4: Referral Management screen used to initiate triage.
Once selected, the WGOS Triage Clinical Form will open, allowing you to review the referral documentation and record the clinical assessment.
Step 4: Reviewing the Referral Documentation
The clinical triage screen is divided into two main areas.
Left-hand panel: Displays the original referral documentation and provides access to available supporting information.
Right-hand panel: Displays the WGOS Triage Clinical Form, where the triage assessment is completed.
Reviewing the original referral
Before recording a clinical outcome, carefully review the original referral documentation.
This is an important stage of the process because the triage decision should be based on the clinical information provided by the referring Optical Practice.
Depending on the referral, the documentation may contain:
- Patient demographic information
- Reason for referral
- Presenting symptoms
- Clinical history
- Relevant examination findings
- Referral priority
- Additional clinical observations
- Supporting investigations or images
Use the document viewer to examine the referral.
If the document contains multiple pages, use the page navigation controls at the bottom of the viewer to move between pages.
Ensure that all relevant pages have been reviewed before progressing to the clinical outcome.
Accessing supporting documents
Where additional documentation is available, the following options may be displayed:
Download Documents
Allows you to access the available referral documents outside the embedded viewer where necessary.
View images in PACS
Provides access to supporting clinical images where PACS integration and appropriate permissions are available.
Supporting images should be reviewed where clinically relevant and required to inform the assessment.
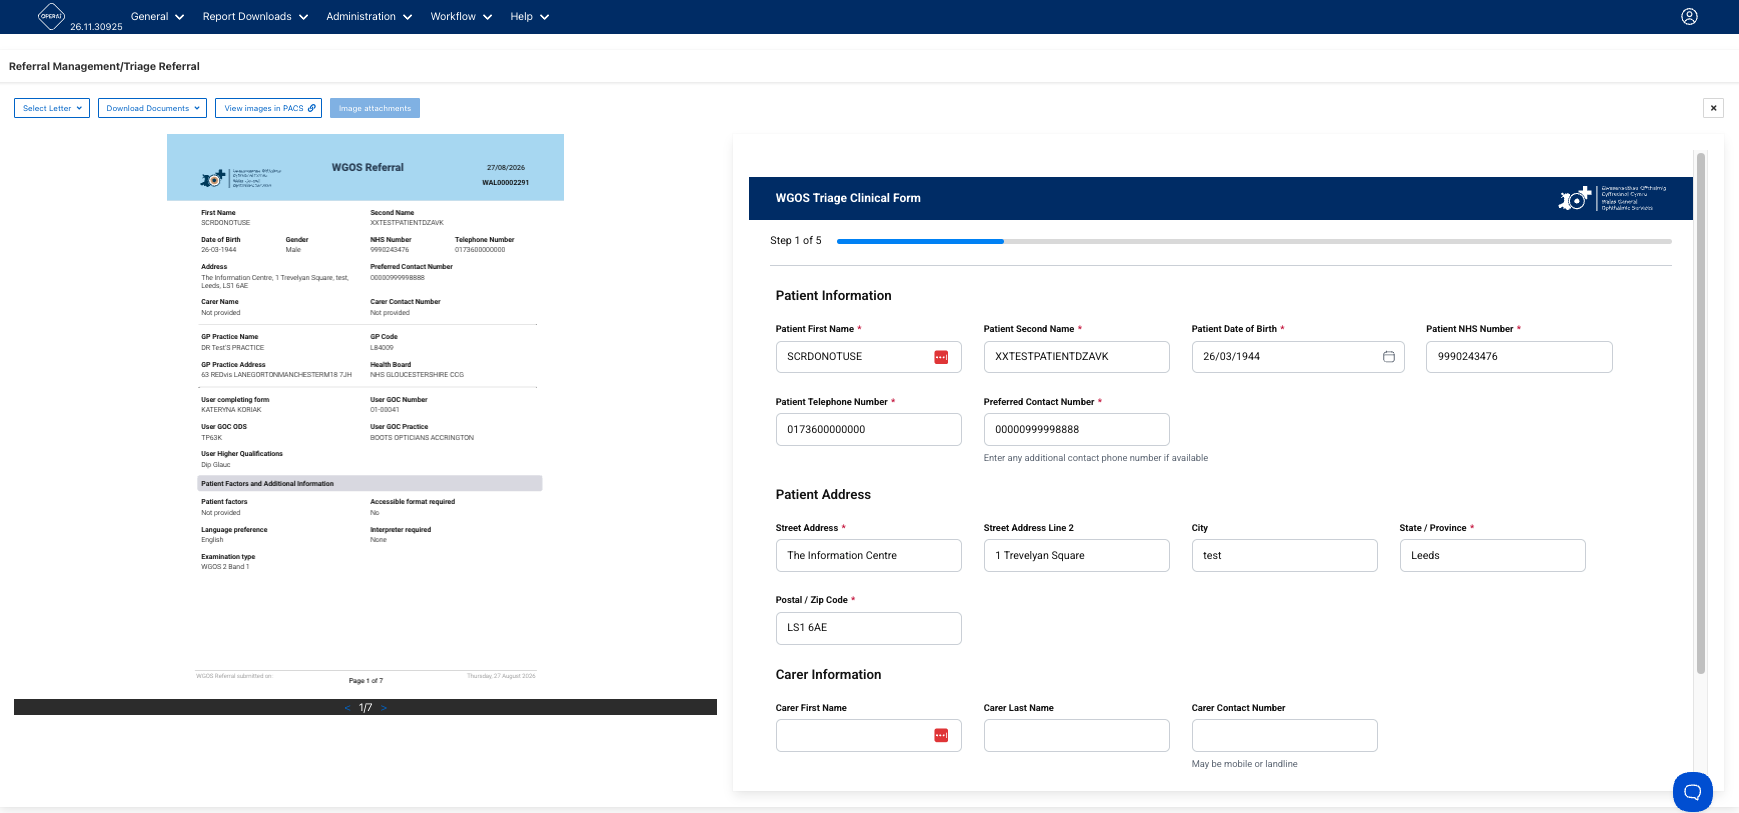
Figure 5: Referral documentation displayed alongside the WGOS Triage Clinical Form.
Do not make a clinical triage decision based solely on the referral summary or dashboard information. Review the full referral and any clinically relevant supporting documentation before determining an outcome.
Step 5: Reviewing Patient Information
The WGOS Triage Clinical Form contains five stages. A progress indicator at the top of the form shows which stage you are currently completing.
The first stage contains patient demographic and contact information.
Before progressing, review the information displayed and check that it corresponds with the original referral.
Patient identity
Check the following details:
- Patient first name
- Patient second name or surname
- Date of birth
- NHS number
These details are important for ensuring that the clinical assessment is associated with the correct patient.
Contact information
Review the patient's telephone number and preferred contact number.
Where an alternative contact number has been supplied, check that it is recorded appropriately.
Address information
Review the patient's recorded address, including the postcode and other available address fields.
Carer information
Where applicable, the form may also contain details of a carer or alternative contact.
Review any information provided, including the carer's name and contact number.
This information may be relevant where a patient requires additional support with communication or appointment arrangements.
If you identify discrepancies in the patient information, follow your organisation's established process for resolving them before continuing.
Once you are satisfied that the patient details have been reviewed, select Next.
Step 6: Reviewing the Clinical Information
The next stage of the WGOS Triage Clinical Form allows you to continue reviewing the clinical information associated with the referral.
Review the information displayed and complete any fields required for the assessment.
The information entered should accurately reflect the referral documentation and the clinical assessment being undertaken.
Moving through the form
Use the navigation buttons at the bottom of the form to move between stages.
Next: Moves forward to the next stage of the triage form.
Back: Returns to the previous stage if you need to review or amend information.
Where mandatory fields are displayed, these must be completed before the form can progress.
Take time to check the information at each stage. Although the Back button allows you to return to previous sections, reviewing information as you progress can reduce errors and avoid unnecessary amendments later.
Step 7: Selecting a Clinical Triage Outcome
At Step 3 of the WGOS Triage Clinical Form, you will be asked to record the clinical triage outcome.
This is a key stage of the process because the outcome determines how the referral will progress following submission.
Review the referral details
Before selecting an outcome, review the information displayed, including:
- Referring Optical Practice
- Referrer's GOC number
- Referrer's ODS code
- Chosen hospital provider
- Clinic type
- Date of triage
- Referral priority
Confirm that the information is consistent with the referral being assessed.
Available triage outcomes
There are four clinical triage outcomes available.
Outcome 1: Accept for Booking at This Hospital
Select this outcome when the referral has been clinically assessed and is considered appropriate for the receiving hospital service.
This indicates that the referral can proceed towards the hospital booking process.
Before selecting this outcome, ensure that:
- The referral is appropriate for the selected service.
- The available clinical information is sufficient.
- The referral priority has been reviewed.
- Any relevant supporting documentation has been considered.
Following submission, the referral will progress according to the configured booking workflow.
Outcome 2: Request Further Information from Optical Practice
Select this outcome when additional information is required from the referring Optical Practice before a clinical decision can be completed.
This may be appropriate where the referral does not contain sufficient information to determine the next clinical action.
Examples of information that may need clarification include:
- Missing clinical measurements
- Incomplete examination findings
- Unclear referral information
- Additional relevant clinical history
- Supporting investigation results
When requesting additional information, clearly explain what is required and why it is necessary to progress the referral.
Avoid general comments such as "More information required" without specifying what information is missing.
Outcome 3: Return to Optical Practice with Advice
Select this outcome when the referral is being returned to the referring Optical Practice with clinical advice.
This outcome also includes referrals that are rejected following clinical review.
The reason for returning the referral should be clearly documented.
Where appropriate, provide sufficient information to explain the clinical decision and any recommended next steps.
Comments should be professional, clear and relevant to the referral.
Outcome 4: Escalate for Secondary Triage
Select this outcome when the referral requires further review by another appropriately authorised clinician.
Secondary triage may be appropriate where additional clinical expertise, clarification or a further opinion is required before a final outcome can be determined.
When escalating a referral, use the internal triage comments to explain the reason for escalation.
Where appropriate, identify the clinician or team being asked to undertake the review.
For example:
FAO Dr Smith – Please review this referral and provide a secondary clinical opinion regarding the appropriate triage outcome.
This is an illustrative example only. Actual comments should reflect the individual referral and local procedures.
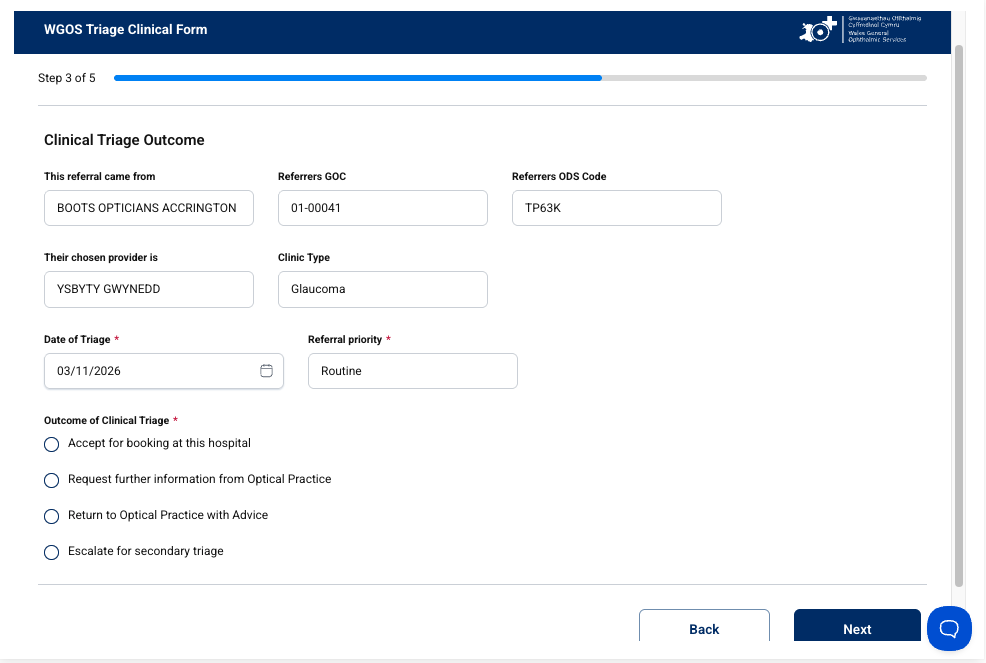
Figure 6: Clinical Triage Outcome section showing the four available triage decisions.
The selected outcome must reflect the clinical assessment and relevant local pathway requirements. If you are unsure which outcome is appropriate, follow your organisation's escalation process.
Step 8: Completing Clinical Triage Details and Comments
At Step 4 of the WGOS Triage Clinical Form, you will be asked to complete the relevant clinical triage details and comments.
Clinical triage details
The form may require you to record:
- Health Risk Factor (HRF)
- Timeframe for assessment, in weeks
- Clinic type
Complete these fields in accordance with the clinical assessment and applicable local pathway guidance.
Where Health Risk Factor options are displayed, select the appropriate option based on the relevant clinical criteria.
The assessment timeframe should reflect the clinically determined requirement for the patient.
Do not select a timeframe simply because it is commonly used for a particular clinic.
Internal Triage Comments
The Internal Triage Comments field allows you to record information relevant to the internal management of the referral.
This may include:
- Reasons for secondary triage
- Requests for additional clinical review
- Relevant internal observations
- Clarification for another reviewing clinician
- Other information needed to support internal handling
Where the referral is being escalated, this field can be used to explain the reason for the escalation and the review being requested.
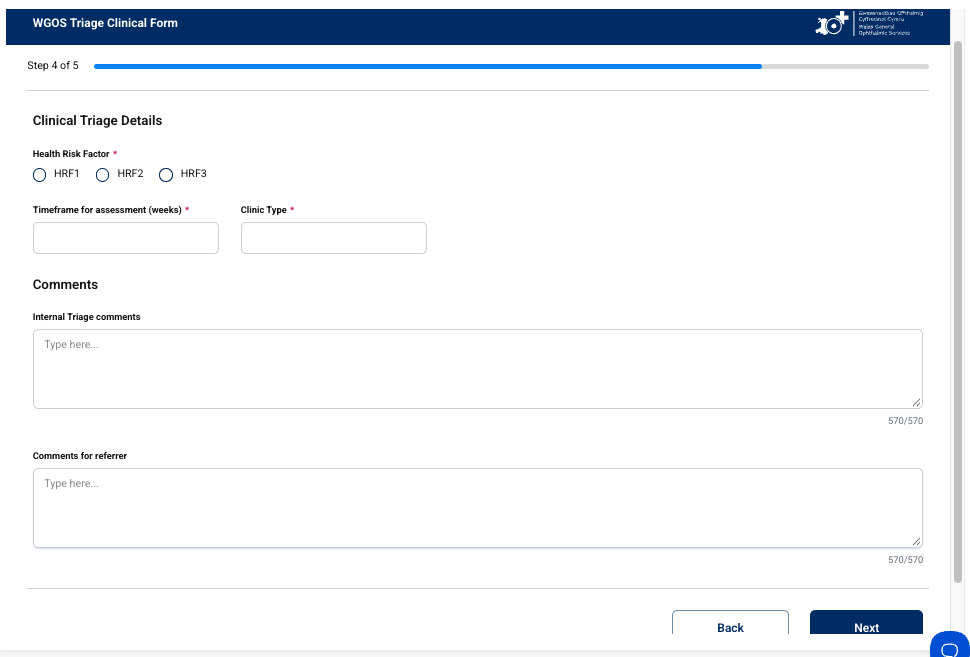
Figure 7: Clinical Triage Details and Comments section.
Comments for Referrer
The Comments for Referrer field is used to communicate relevant information back to the referring Optical Practice.
This is particularly important when:
- Further information is being requested.
- The referral is being returned with advice.
- A referral has been rejected.
- The referring practice needs to understand the next action required.
Where this field is marked as mandatory, a comment must be entered before continuing.
Writing effective comments
When entering comments for the referring Optical Practice:
- Use clear and professional language.
- Explain the reason for the selected outcome.
- Identify any missing information.
- Specify any action required from the practice.
- Avoid unnecessary abbreviations.
- Ensure comments are relevant to the patient and referral.
For example, when requesting additional information:
Please provide the additional clinical information required to support assessment of this referral, including the relevant examination findings identified as missing during triage.
This example should be adapted to specify the actual information required for the individual referral.
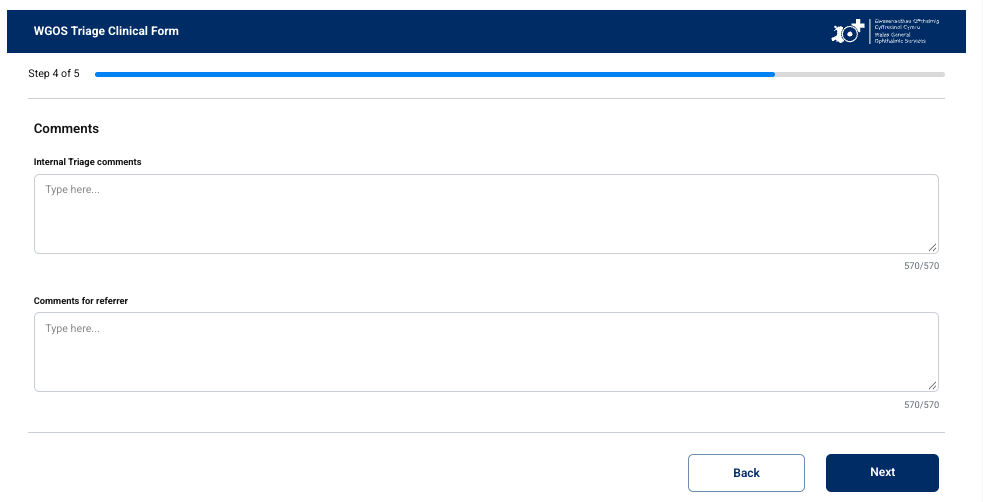
Figure 8: Internal Triage Comments and Comments for Referrer fields.
Once the relevant information has been completed, select Next.
Step 9: Reviewing the Final Triage Outcome
Step 5 is the final stage of the WGOS Triage Clinical Form.
This screen provides an opportunity to review the selected triage outcome before submission.
The selected outcome will be displayed within the Triage Outcome section.
Final checks
Before submitting the referral, confirm that:
- The correct referral has been assessed.
- The referral documentation has been reviewed.
- The patient information has been checked.
- The clinical triage outcome is correct.
- Required clinical details have been completed.
- Any necessary internal comments have been entered.
- Any required comments for the referrer are clear and complete.
If you identify an error, select Back to return to the relevant section and make the necessary amendment.
Once you are satisfied that the assessment is complete and accurate, you can proceed to submission.
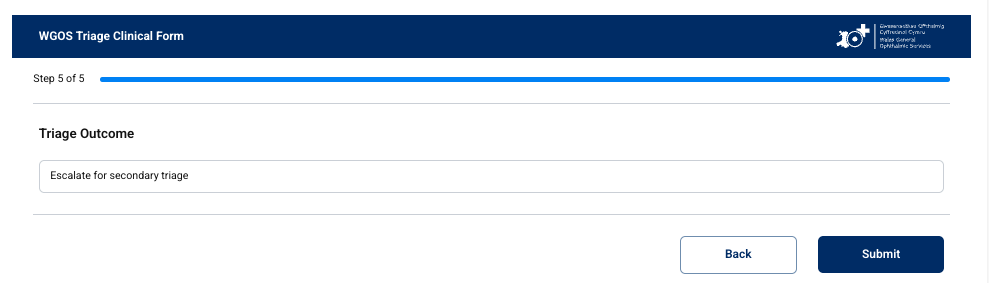
Figure 9: Final review screen showing the selected triage outcome and Submit button.
Step 10: Submitting the Referral
Once all stages of the triage assessment have been completed and the selected outcome has been checked, select Submit.
The application will process the triage decision and display confirmation that the referral has been submitted.
The referral status will then update to reflect the clinical triage outcome selected.
What happens next?
The next stage of the referral depends on the outcome recorded.
Accepted for booking:
The referral progresses towards the relevant hospital booking process.
Further information requested:
The referral progresses through the configured process for requesting additional information from the Optical Practice.
Returned with advice:
The referral progresses through the return process, with the relevant advice recorded for the referrer.
Escalated for secondary triage:
The referral is directed for further clinical review through the configured secondary triage workflow.
Once the application confirms successful submission, the triage assessment has been recorded and the referral status updated. You can return to the Hospital Dashboard to continue reviewing other referrals.
Additional Guidance and Good Practice
Review all available information
A clinical triage decision should be informed by the relevant referral documentation and supporting clinical evidence.
Where information is missing or unclear, follow the appropriate process to obtain clarification.
Use clear and accurate comments
Comments should provide sufficient information for the intended recipient to understand the decision or action required.
Remember that internal comments and comments for the referrer serve different purposes.
Check before submitting
Always review the selected clinical outcome before selecting Submit.
This final check helps reduce the risk of incorrect outcomes being recorded.
Follow local clinical procedures
The OPERAi application supports the referral management process.
Clinical decisions, prioritisation and escalation should continue to follow your organisation's approved clinical protocols and governance arrangements.
Common Questions and Troubleshooting
I cannot find the referral I need to triage.
Check that you are logged into the correct hospital site and have selected the appropriate clinic type.
Review both the Referrals for Triage and Escalated Referrals tabs, where appropriate.
If the referral is still not visible, use the Manage Referrals page to search for th revelant referral using the URN.
The referral documentation contains multiple pages.
Use the navigation controls at the bottom of the document viewer to move between pages.
Review all relevant clinical information before selecting a triage outcome.
I need to correct information entered earlier.
Use the Back button within the WGOS Triage Clinical Form to return to the relevant stage.
Make the necessary amendments and continue through the form.
I cannot progress to the next stage.
Check whether any mandatory fields have been left incomplete.
Mandatory fields are generally identified by an asterisk (*).
Complete the required information and try again.
I am unsure which clinical outcome to select.
Do not select an outcome without sufficient clinical justification.
Follow your organisation's clinical escalation procedures and seek appropriate internal advice where necessary.
I have submitted the referral but cannot see confirmation.
Check whether the application has displayed a submission confirmation or an updated referral status.
If the outcome cannot be confirmed, or an ERROR staus shows use the blue help bubble to contact the OPERAi Support Desk.
Summary: Completing a Referral Triage
The OPERAi clinical triage workflow follows a structured process:
- Sign in and confirm your hospital site.
- Select the appropriate clinic type.
- Locate the referral awaiting triage.
- Open the referral and select Triage Referral.
- Review the referral documentation and supporting information.
- Check the patient demographic and clinical details.
- Select the appropriate clinical triage outcome.
- Complete the required clinical details and comments.
- Review the final outcome.
- Submit the referral and confirm the updated status.
Accurate clinical triage is essential to ensuring referrals progress through the appropriate clinical pathway. Always review the available information, record clear decisions and follow your organisation's clinical governance procedures.